A Guide to Using U-Nets for Image Segmentation
Image segmentation is a powerful technique to locate objects or boundaries in images on a per-pixel level. In this blog we take a quick look at how U-Nets work, explore how they build on standard CNNs, and show how easy it is to build and iterate on U-Nets in PerceptiLabs.
Deep Learning (DL)-based image processing is now used across a variety of industries. In particular, methods like image classification (i.e., identifying what an image represents), and object detection (i.e., identifying an object and its location in the image) are being applied in use cases ranging from computer vision applications (e.g., autonomous driving) to identifying people in security videos.
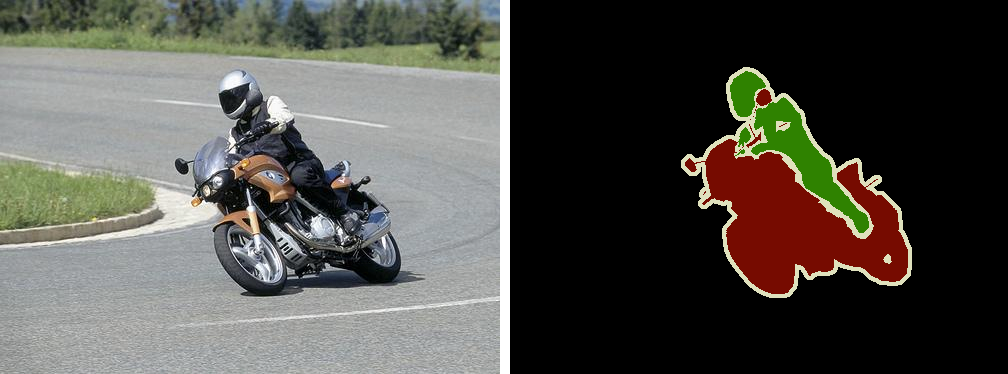
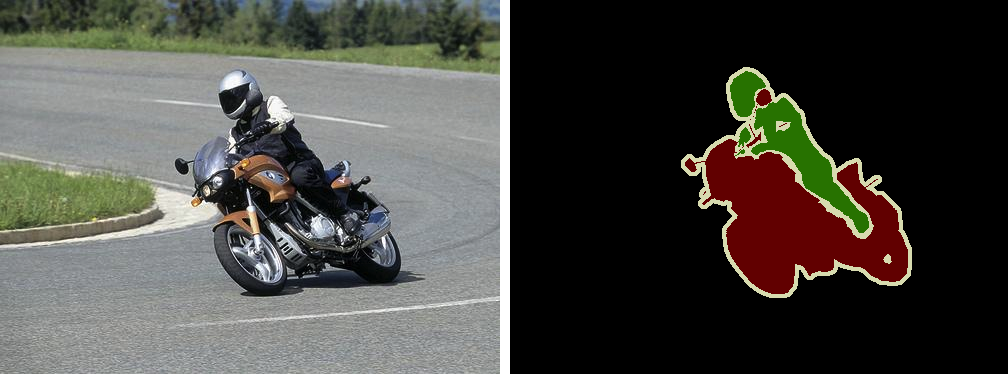
Another powerful method is semantic image segmentation, also called pixel-level classification or dense prediction, which allows us to classify parts of an image that belong to the same object class, on a per-pixel level. For example, the image above shows how segmentation can be used to highlight the pixels belonging to a motorcycle and its rider by analyzing a full-color image. And Instance segmentation takes this a step further by identifying all instances of objects belonging to the same class (e.g., motorcycle 1, motorcycle 2).
Semantic image segmentation can be achieved by using a U-Net, a special type of Convolutional Neural Network (CNN). A U-Net adds an expansive path to generate classifications of the pixels belonging to feature(s) or object(s) found in the source image. In other words, it expands the output up to a certain image size, and forms the latter part of the U in the network. A U-Net allows us to go above and beyond normal image classification and object detection to classify the pixels of those objects in their exact shape.
Let's take a closer look at how this works.
A Review of CNNs
In order to understand U-Nets, let's briefly review how their underlying foundation, the standard CNN, works.
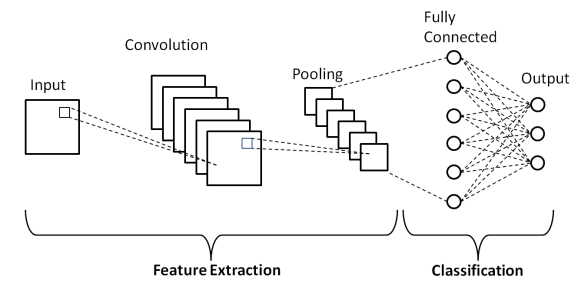
We emphasize standard because there are a number of variations including LeNet, AlexNet, and other CNNs, which all work off the same general principle of taking an image as input and convolving it using filters (aka kernels) to extract one or more feature maps, a process known as feature extraction. These feature maps are then down-sampled through pooling and passed to the next layer for further convolving and pooling. The feature map(s) produced in each subsequent convolving/pooling step, extract higher-level features. The final down-sampled (pooled) feature map is then flattened and used as input to a fully-connected neural network for classification as shown in Figure 1:
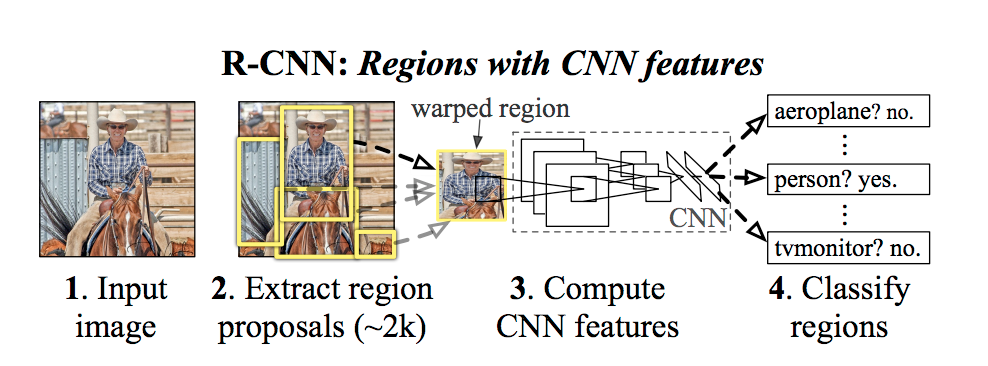
Depending on how you architect the network, you can modify how the feature extraction stage works and add as many layers as required for your application. For example, an R-CNN, shown in Figure 2 below, performs object detection by classifying regions of an image:
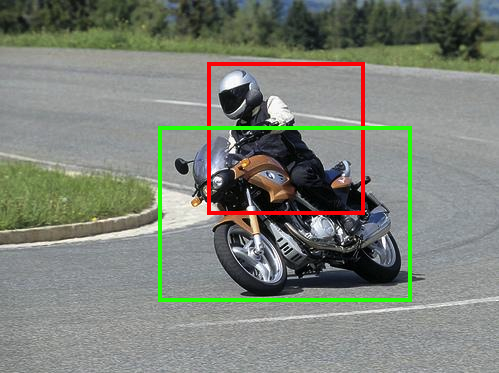
Consider our image of a rider on their motorcycle as an example. The first feature map(s) of an R-CNN analyzing that image might consist of groups of pixels representing basic shapes found in the image (e.g., curves, straight segments, etc.). The next layer might extract groups of shapes that make up certain features of those objects (e.g., helmet, wheels, etc.), and so on.
The final output includes the classification showing what objects were found in regions of the image as you can see in Figure 3:
CNNs have become popular for image-processing tasks because they can work with spatial and temporal variances, while reducing (down sampling) intermediate images within the model using pooling to increase processing speed. In fact, CNNs are so useful for image processing, that you'll see them mentioned numerous times in our Top Five Ways That Machine Learning is Being Used for Image Processing and Computer Vision blog.
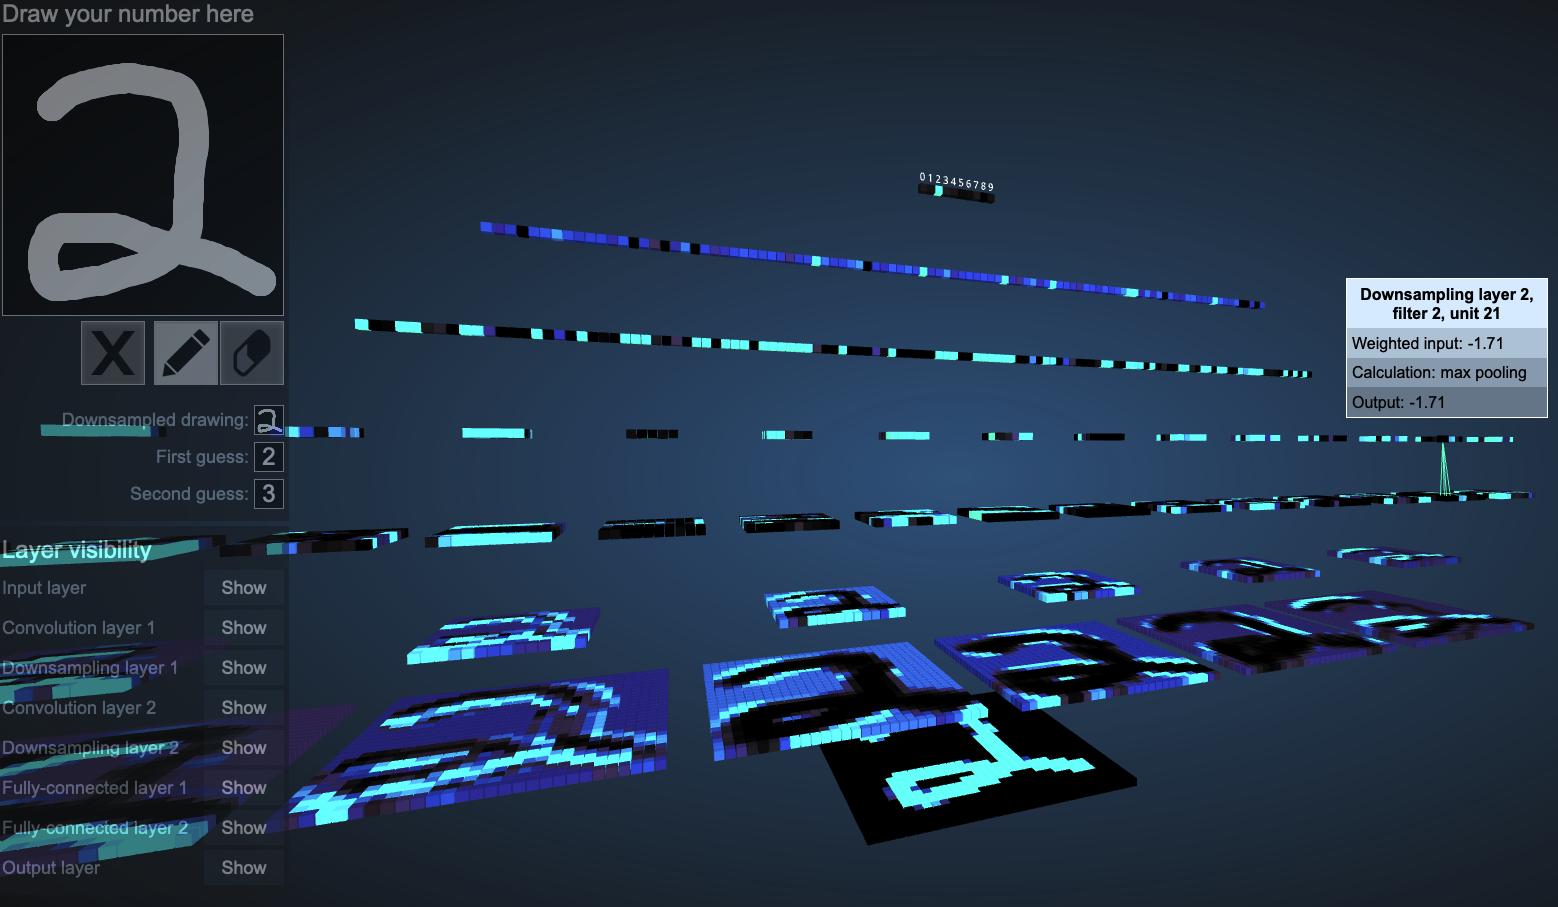
If you want to further reinforce your understanding of how CNNs work, check out this very cool interactive 3D CNN visualization tool:
For additional information about the construction of feature maps, be sure to check out our description of a convolution layer in our blog: Four Common Types of Neural Network Layers (and When to use Them).
Expanding to U-Nets
The CNN architecture described so far consists of a contracting path (aka the encoder) which iteratively builds feature maps using continuously down-sampled data.
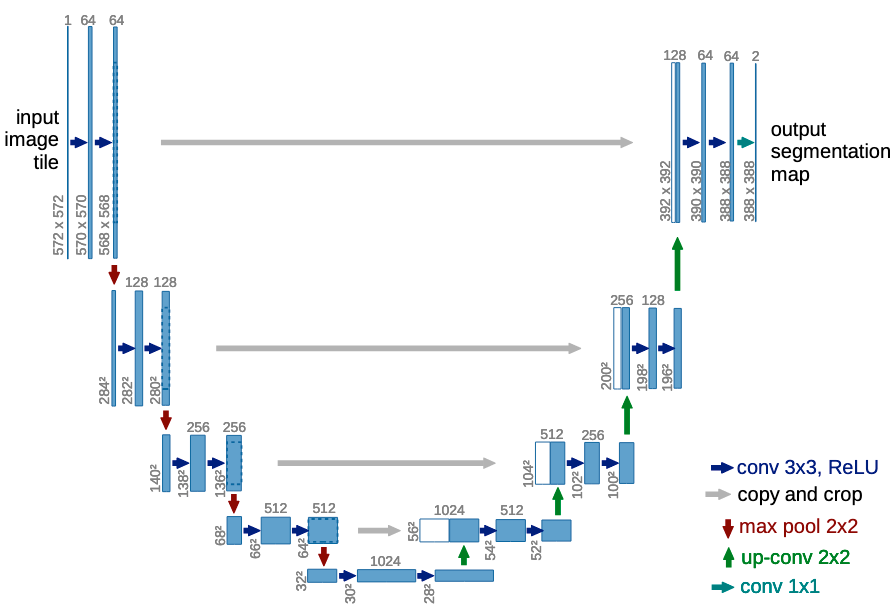
A U-Net augments the standard CNN architecture by adding a corresponding expansive path (aka the decoder) with the goal of producing a full-resolution semantic prediction. In other words, to generate segmentation images that highlight specific features and objects that were found in the image. These highlights are done on a per-pixel level, using specific color values, and the output images are generally at least the same size (dimensions) as that of the source image.
Take our motorcycle example image from above. Using a U-Net for image segmentation, we could classify objects at a much more granular level than with object detection which is limited to bounding boxes. As shown in Figure 5 below, the output (right) classifies the objects from the source image (left) on a per-pixel basis:
The expansive pathway of a U-Net works by up sampling the various feature maps from the contracting path using transpose convolutions, a process sometimes referred to as deconvolution. The expansive pathway also has some connections with the contracting path, known as skip connections. Using the skip connections and the normal connections, the expansive path combines feature information (increases during the contracting path) together with spatial information (decreases during the contracting path).
DL practitioners often depict the contracting and expansive paths and their skip connections in a U shape as shown in Figure 6, hence the name U-Net:
When architecting a U-Net for transfer learning, the selection of the model's backbone becomes important. This essentially means to select the underlying CNN (e.g., VGG, ResNet etc.) on which to base the U-Net around. The selection defines the configuration of the layers in both the contracting and corresponding expansive paths.
PerceptiLabs Makes U-Nets Easy
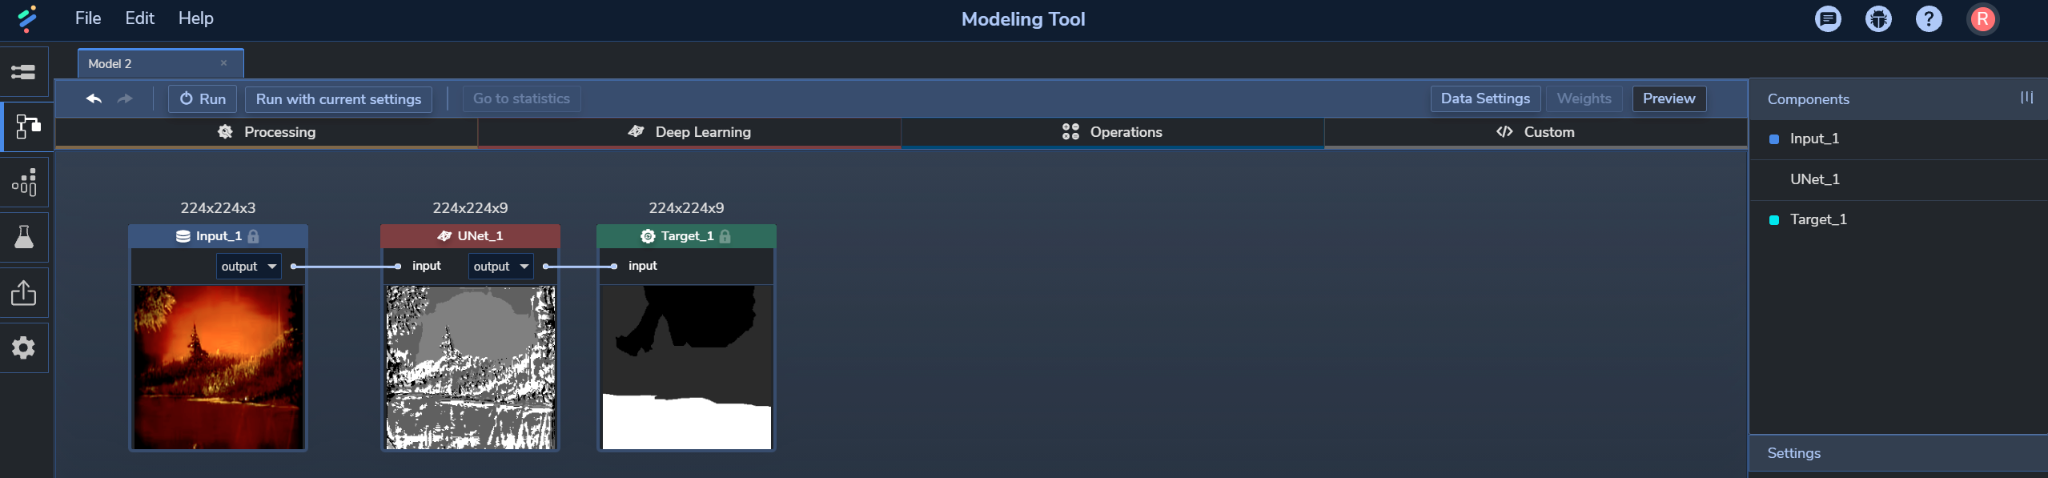
PerceptiLabs makes it easy to set up a U-Net and experiment with different parameters and backbones. Simply select and drop a U-Net Component into your model, hook it up to your input and target, and then configure its parameters. The U-Net Component abstracts away all of its contracting and expansive layers so you can focus how it transforms its input as shown in Figure 7 below:
You can easily try out different backbones by selecting them from the Component's Backbone setting. And other settings like Activation, Output Activation, Pooling, and Unpooling methods, can just as easily be experimented with in a similar manner. From there, it's just a matter of viewing the training and validation results in Perceptilabs' Statistics View as you experiment with different values as shown in Figure 8:

The Statistics View shows real-time metrics including the predicted segmentation overlayed on ground truth (upper left) and the Intersection Over Union (IoU) (middle right) for validation and training across epochs.
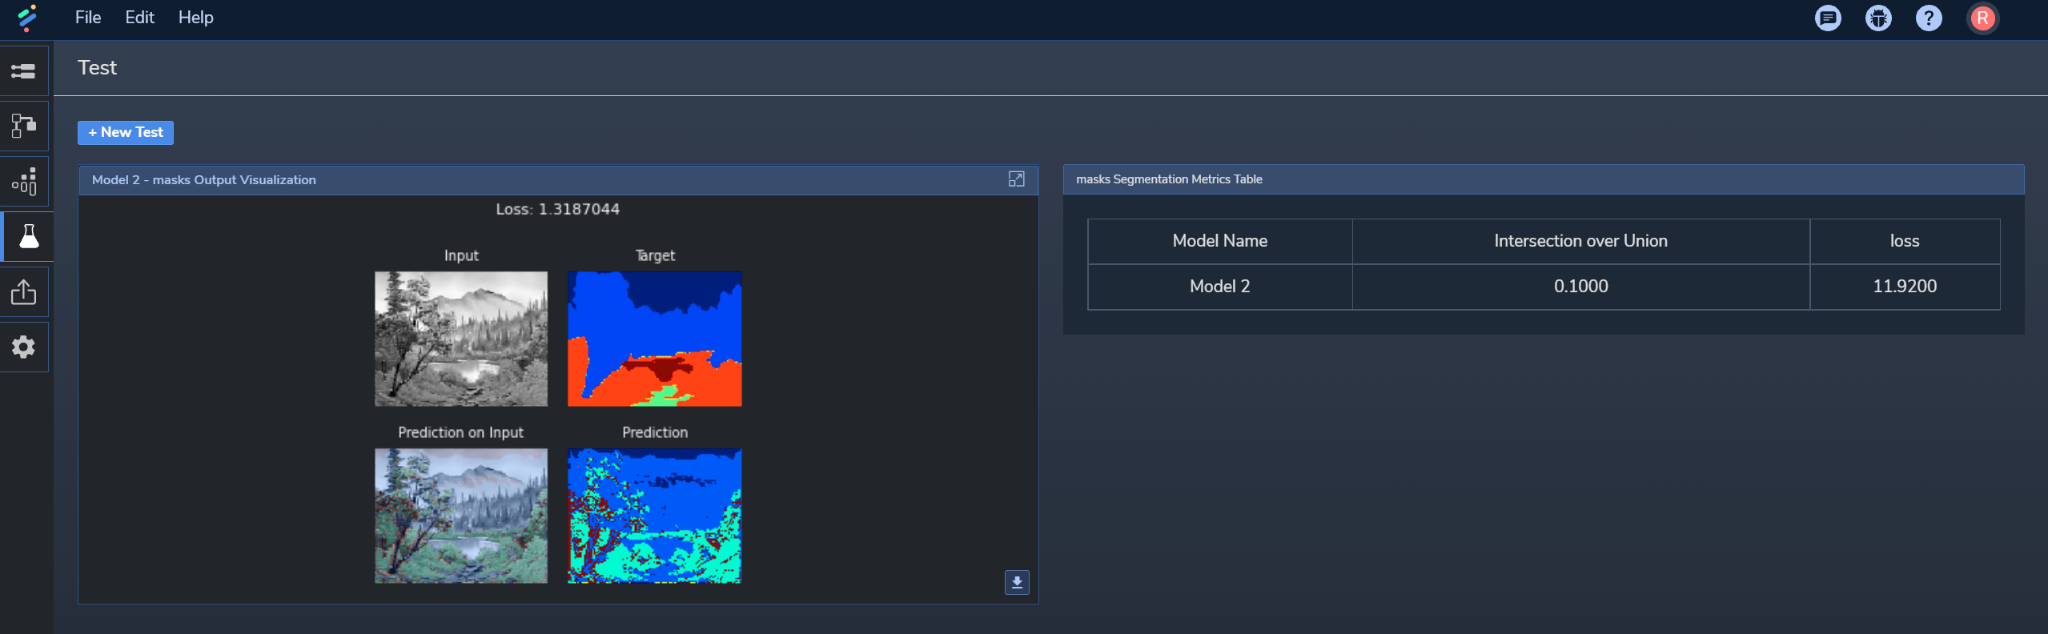
IoU is a great method to assess the model's accuracy. It goes beyond pixel accuracy (which can be unbalanced due to having more background than object-level pixels) by comparing how much the objects in the output overlap those in ground truth. You can also view this for the model's test data in PerceptiLabs' Test View as shown in Figure 9:
Alternatively, you can build U-Nets from scratch in PerceptiLabs. Figure 10 shows how the contracting path can be created using a series of Convolution Components while the expansive path can be built with a combination of Merge and Convolution Components:
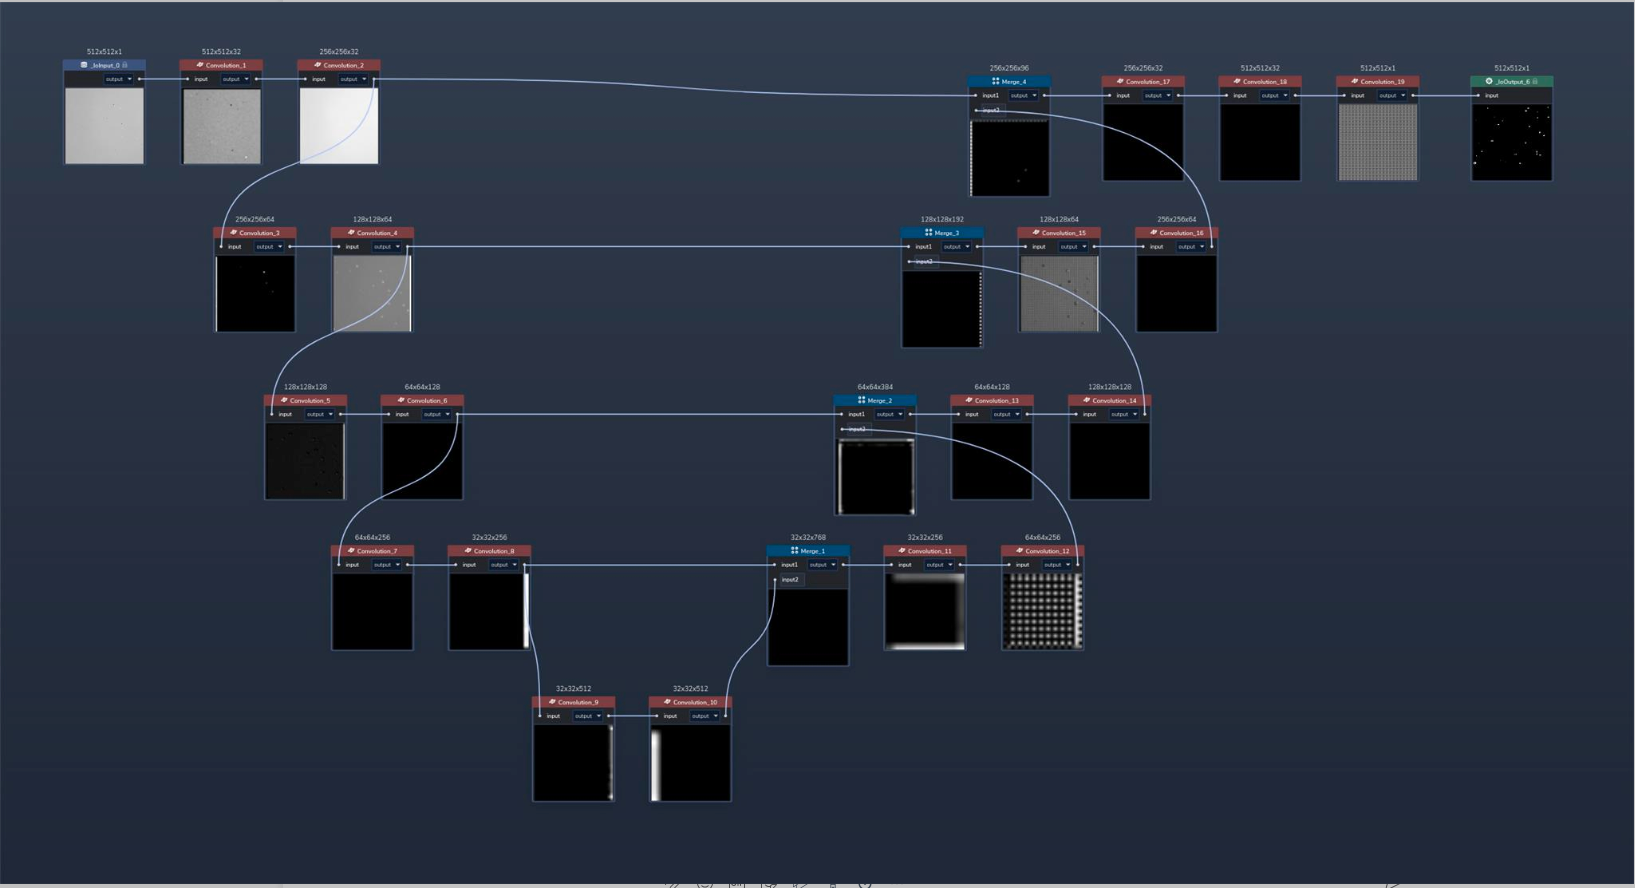
While this method is a bit more work to create, it does provide additional visualization into how each layer transforms the data.
Conclusion
U-Nets are a powerful type of CNN for efficient image segmentation. They were originally developed for biomedical segmentation2, but have since gone on to play a role in other verticals including military, robotics, IoT, city planning, and other fields where detailed analysis of images is required.
PerceptiLabs' U-Net Component encapsulates everything you need to build and train U-Nets, while giving you the option to build them from scratch. Along with the Model Hub where you can organize your models, and the Statistics and Training views where you can view training results in real-time, experimenting with U-Nets has never been easier or quicker.
Ready to try out U-Nets? Run PerceptiLabs and give it a try today!
For additional information we recommend checking out the following great articles:
- UNet — Line by Line Explanation
- An overview of semantic image segmentation
- Understanding Semantic Segmentation with UNET
_________________________________________________________
1Ronneberge et al.