Jupyter Notebooks
Jupyter Notebook is an open-source application, popular in the machine learning community, that allows you to create and share documents comprised of live code (e.g., Python code), equations, and other types of content. Each block of content is displayed in a box called a "cell". Within PerceptiLabs you can view this in the code view.
Each component that you add to your PerceptiLabs model contains Python code that you can view and modify. PerceptiLabs' Notebook view, accessible by toggling the Notebook button (1) on the Modeling Tooltab (2), allows you to view and share all of that code as a Jupyter Notebook (.ipynb file):
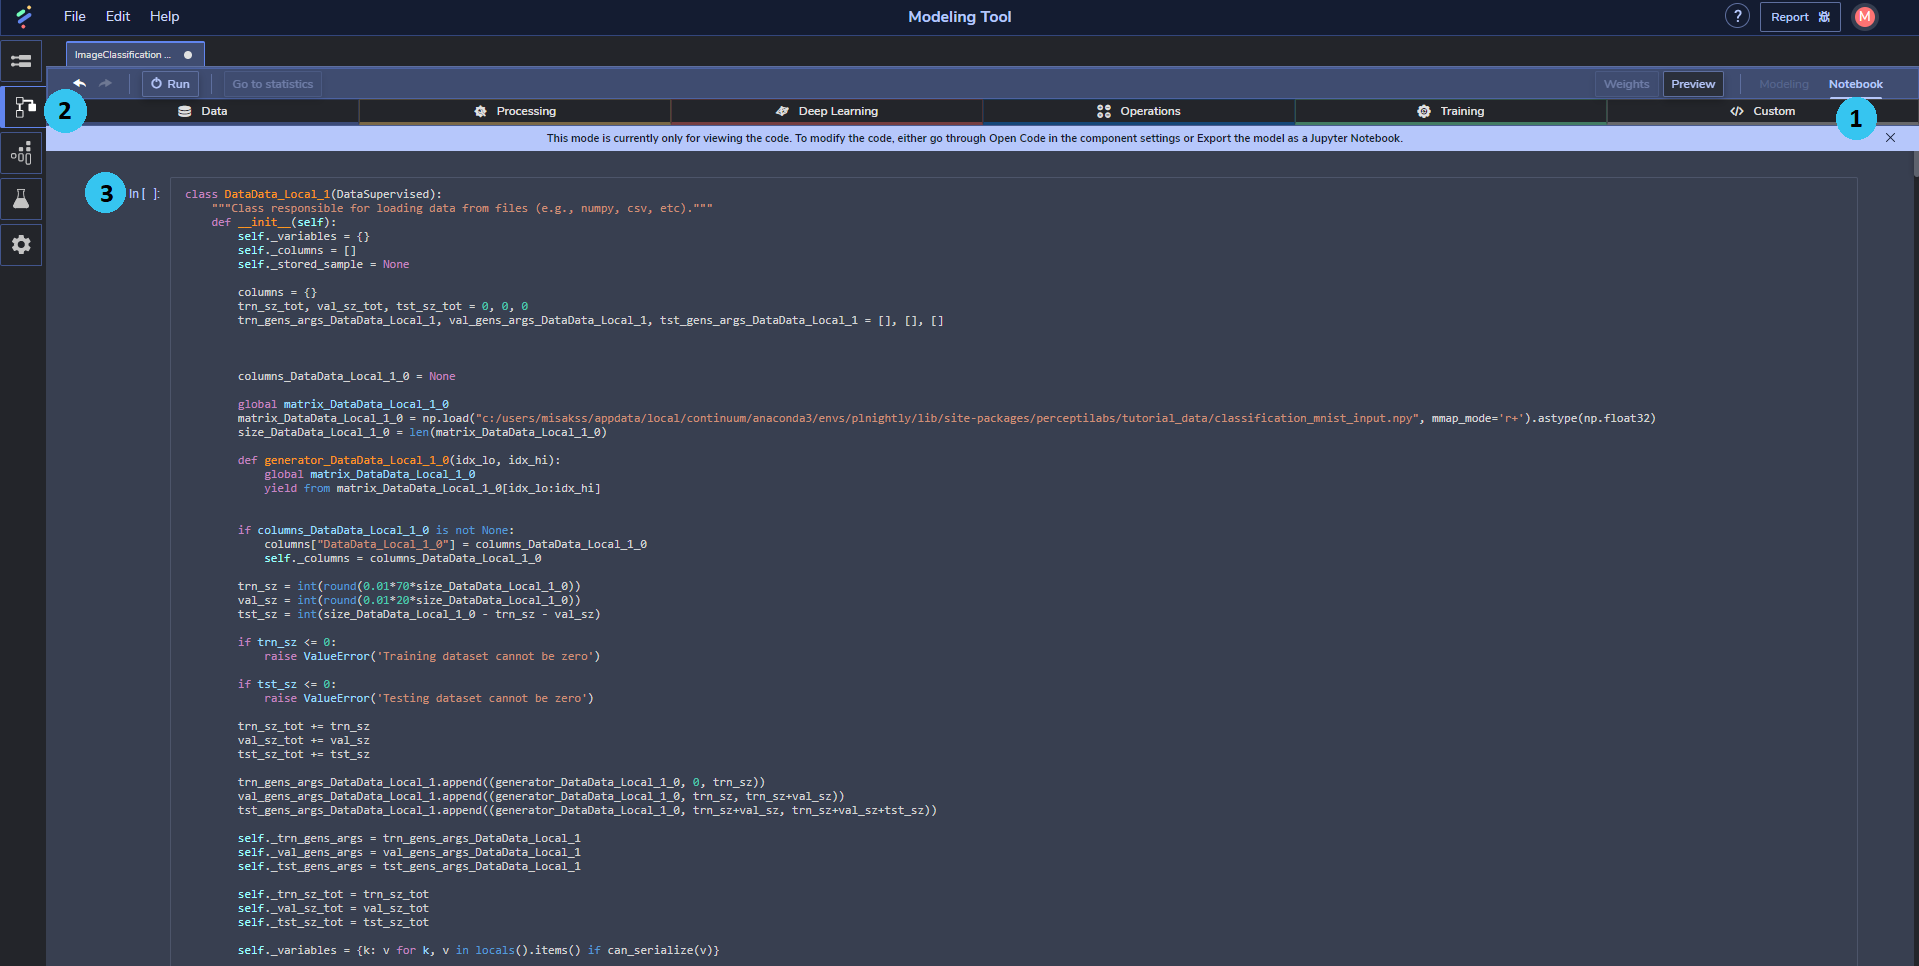
There is one class per component in a PerceptiLabs model, and each class is displayed in a code cell (3) within the notebook.
A Jupyter Notebook file is a JSON file with a .ipynbfile extension, that contains the content and all of the metadata required to display that content in Jupyter Notebook cells. When you export your model from PerceptiLabs, the exported file will contain the following cells:
A basic code cell defining the imports and logger. For example:
import osimport sysimport timeimport daskimport GPUtil...from perceptilabs.core_new.layers.base import ClassificationLayer, Tf1xLayerfrom perceptilabs.core_new.graph.builder import GraphBuilder, SnapshotBuilderfrom perceptilabs.messaging import ZmqMessagingFactory, SimpleMessagingFactoryfrom perceptilabs.core_new.layers.replication import BASE_TO_REPLICA_MAP, REPLICATED_PROPERTIES_TABLElogging.basicConfig(stream=sys.stdout,format='%(asctime)s - %(levelname)s - %(message)s',level=logging.INFO)log = logging.getLogger(__name__)
The logger is included to handle log messages and convey information during initialization and training. It streams the logs to "stdout", which in most cases is the terminal where you run the code from. When running online, this may log to a file or may stream messages to an online viewer, depending on the setup.
One cell for each component in your model containing the component's class. For example, the following shows some of the code from a Reshape component:
class ProcessReshape_Reshape_1(Tf1xLayer):def __call__(self, x: tf.Tensor, is_training: tf.Tensor = None) -> tf.Tensor:""" Takes a tensor as input and reshapes it."""shp = [28, 28, 1]perm = [0, 1, 2]shp = [i for i in shp if i != 0]if(len(shp) != len(perm)):perm = []for i in range(len(shp)):perm.append(i)y = tf.reshape(x, [x.get_shape().as_list()[0] if x.get_shape().as_list()[0] is not None else -1] + shp)y = tf.transpose(y, perm=[0] + [i+1 for i in perm])self.y = yreturn y@propertydef variables(self) -> Dict[str, Picklable]:"""Any variables belonging to this layer that should be rendered in the frontend.Returns:A dictionary with tensor names for keys and picklable for values."""return {}...
One final cell defining the model's layers, edges (connections between the layers), and a GraphBuilder to run the model. For example, the following shows these elements for a simple image classification model:
layers = {'_Data_1': DataData_Data_1(),'_Reshape_1': ProcessReshape_Reshape_1(),'_Convolution_1': DeepLearningConv_Convolution_1(),'_Data_2': DataData_Data_2(),'_Fully_Connected_1': DeepLearningFC_Fully_Connected_1(),'_OneHot_1': ProcessOneHot_OneHot_1(),'_Normal_1': TrainNormal_Normal_1(),}edges = {('_Data_1', '_Reshape_1'),('_Reshape_1', '_Convolution_1'),('_Convolution_1', '_Fully_Connected_1'),('_Data_2', '_OneHot_1'),('_Fully_Connected_1', '_Normal_1'),('_OneHot_1', '_Normal_1'),}graph_builder = GraphBuilder()graph = graph_builder.build(layers, edges)iterator = graph.training_nodes[0].layer_instance.run(graph)result = Nonesentinel = object()while result is not sentinel:result = next(iterator, sentinel)
You can export your code to a Jupyter Notebook file as described here.
You can run the Jupyter Notebook file that you exported from PerceptiLabs, in either an online or local Jupyter Notebook environment. Before you can do so, you must first install PerceptiLabs in that environment using:
pip install perceptilabs
Once installed, you can then open the exported .ipnyb file in Jupyter notebook and run the notebook's various code cells.
When executing the model in Jupyter Notebook, run the initialization cell first, then all the component cells (order does not matter) and finally the last cell. See the previous section for information about each cell.